7 minutes read
I evaluated the decision coordination & quality using the Claude Design from a product strategy standpoint.
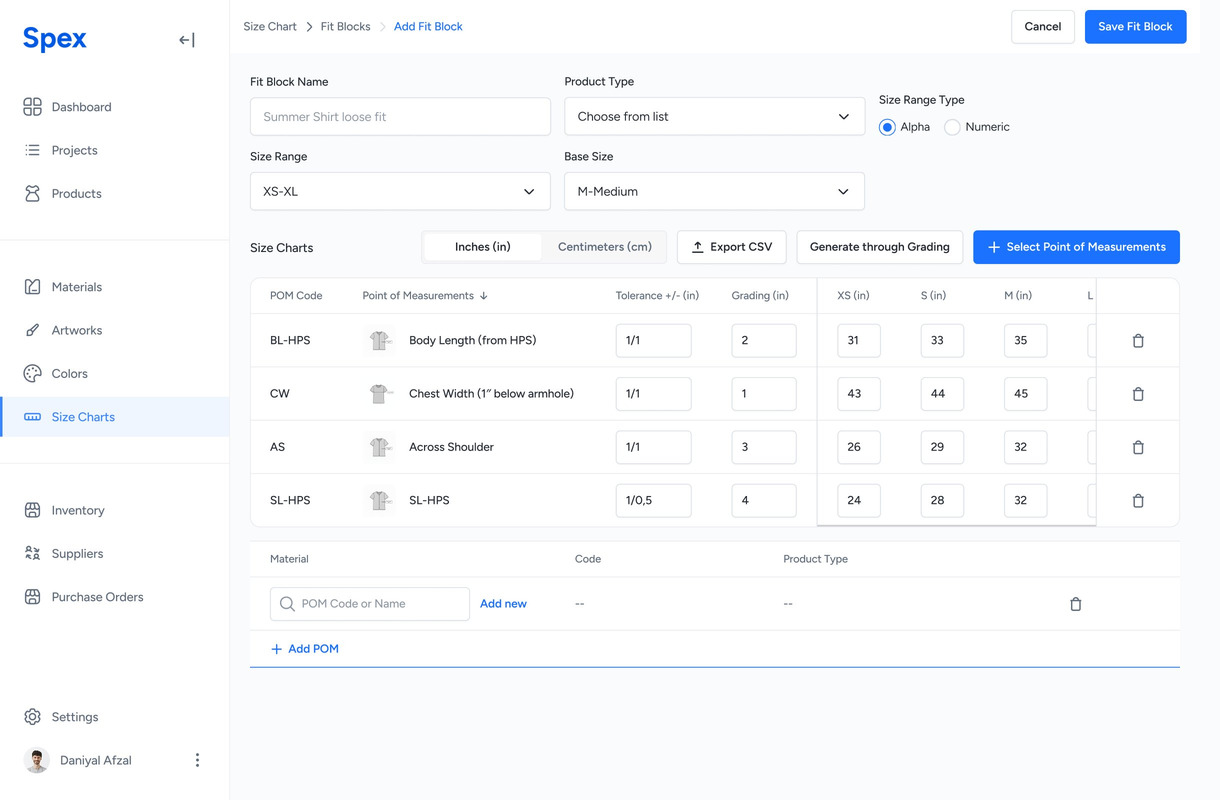
 Before
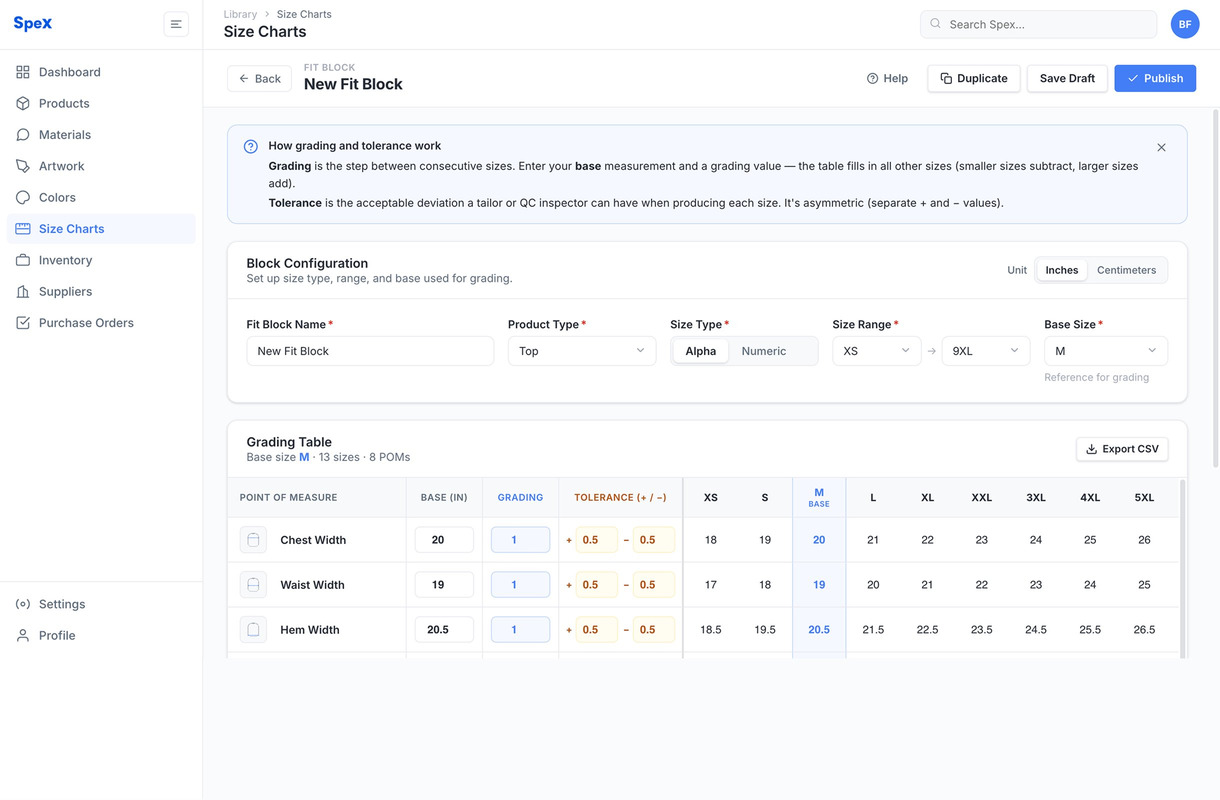
After
Five months after designing a Fit Block workflow for a PLM (Product Line Management) system in Figma, a standardised sizing and measurement use case commonly used in fashion industry tech-packs, I revisited the project using Claude Design to evaluate how effectively Claude Design can handle decision-making and workflow understanding could be delegated to Claude Design, how much context still needed to be explicitly defined by the product owner, and the overall quality of the generated UX output.
Context
What is a Fit Block & This Use Case?
A Fit Block is a standardized sizing table used in fashion tech packs to define garment measurements across different sizes. It includes industry-standard measurement points for products like t-shirts, hoodies, outerwear, pants, and shoes, along with their size ranges (e.g. S–XXL or numeric sizing).
The Fit Block acts as the measurement blueprint that manufacturers use to produce garments accurately. This use case focused on digitizing the process of creating and managing Fit Blocks inside a PLM (Product Line Management) system. The goal was to help designers, manufacturers, and brand owners define measurements, manage size ranges, and update sizing data faster with fewer manual steps and less confusion.
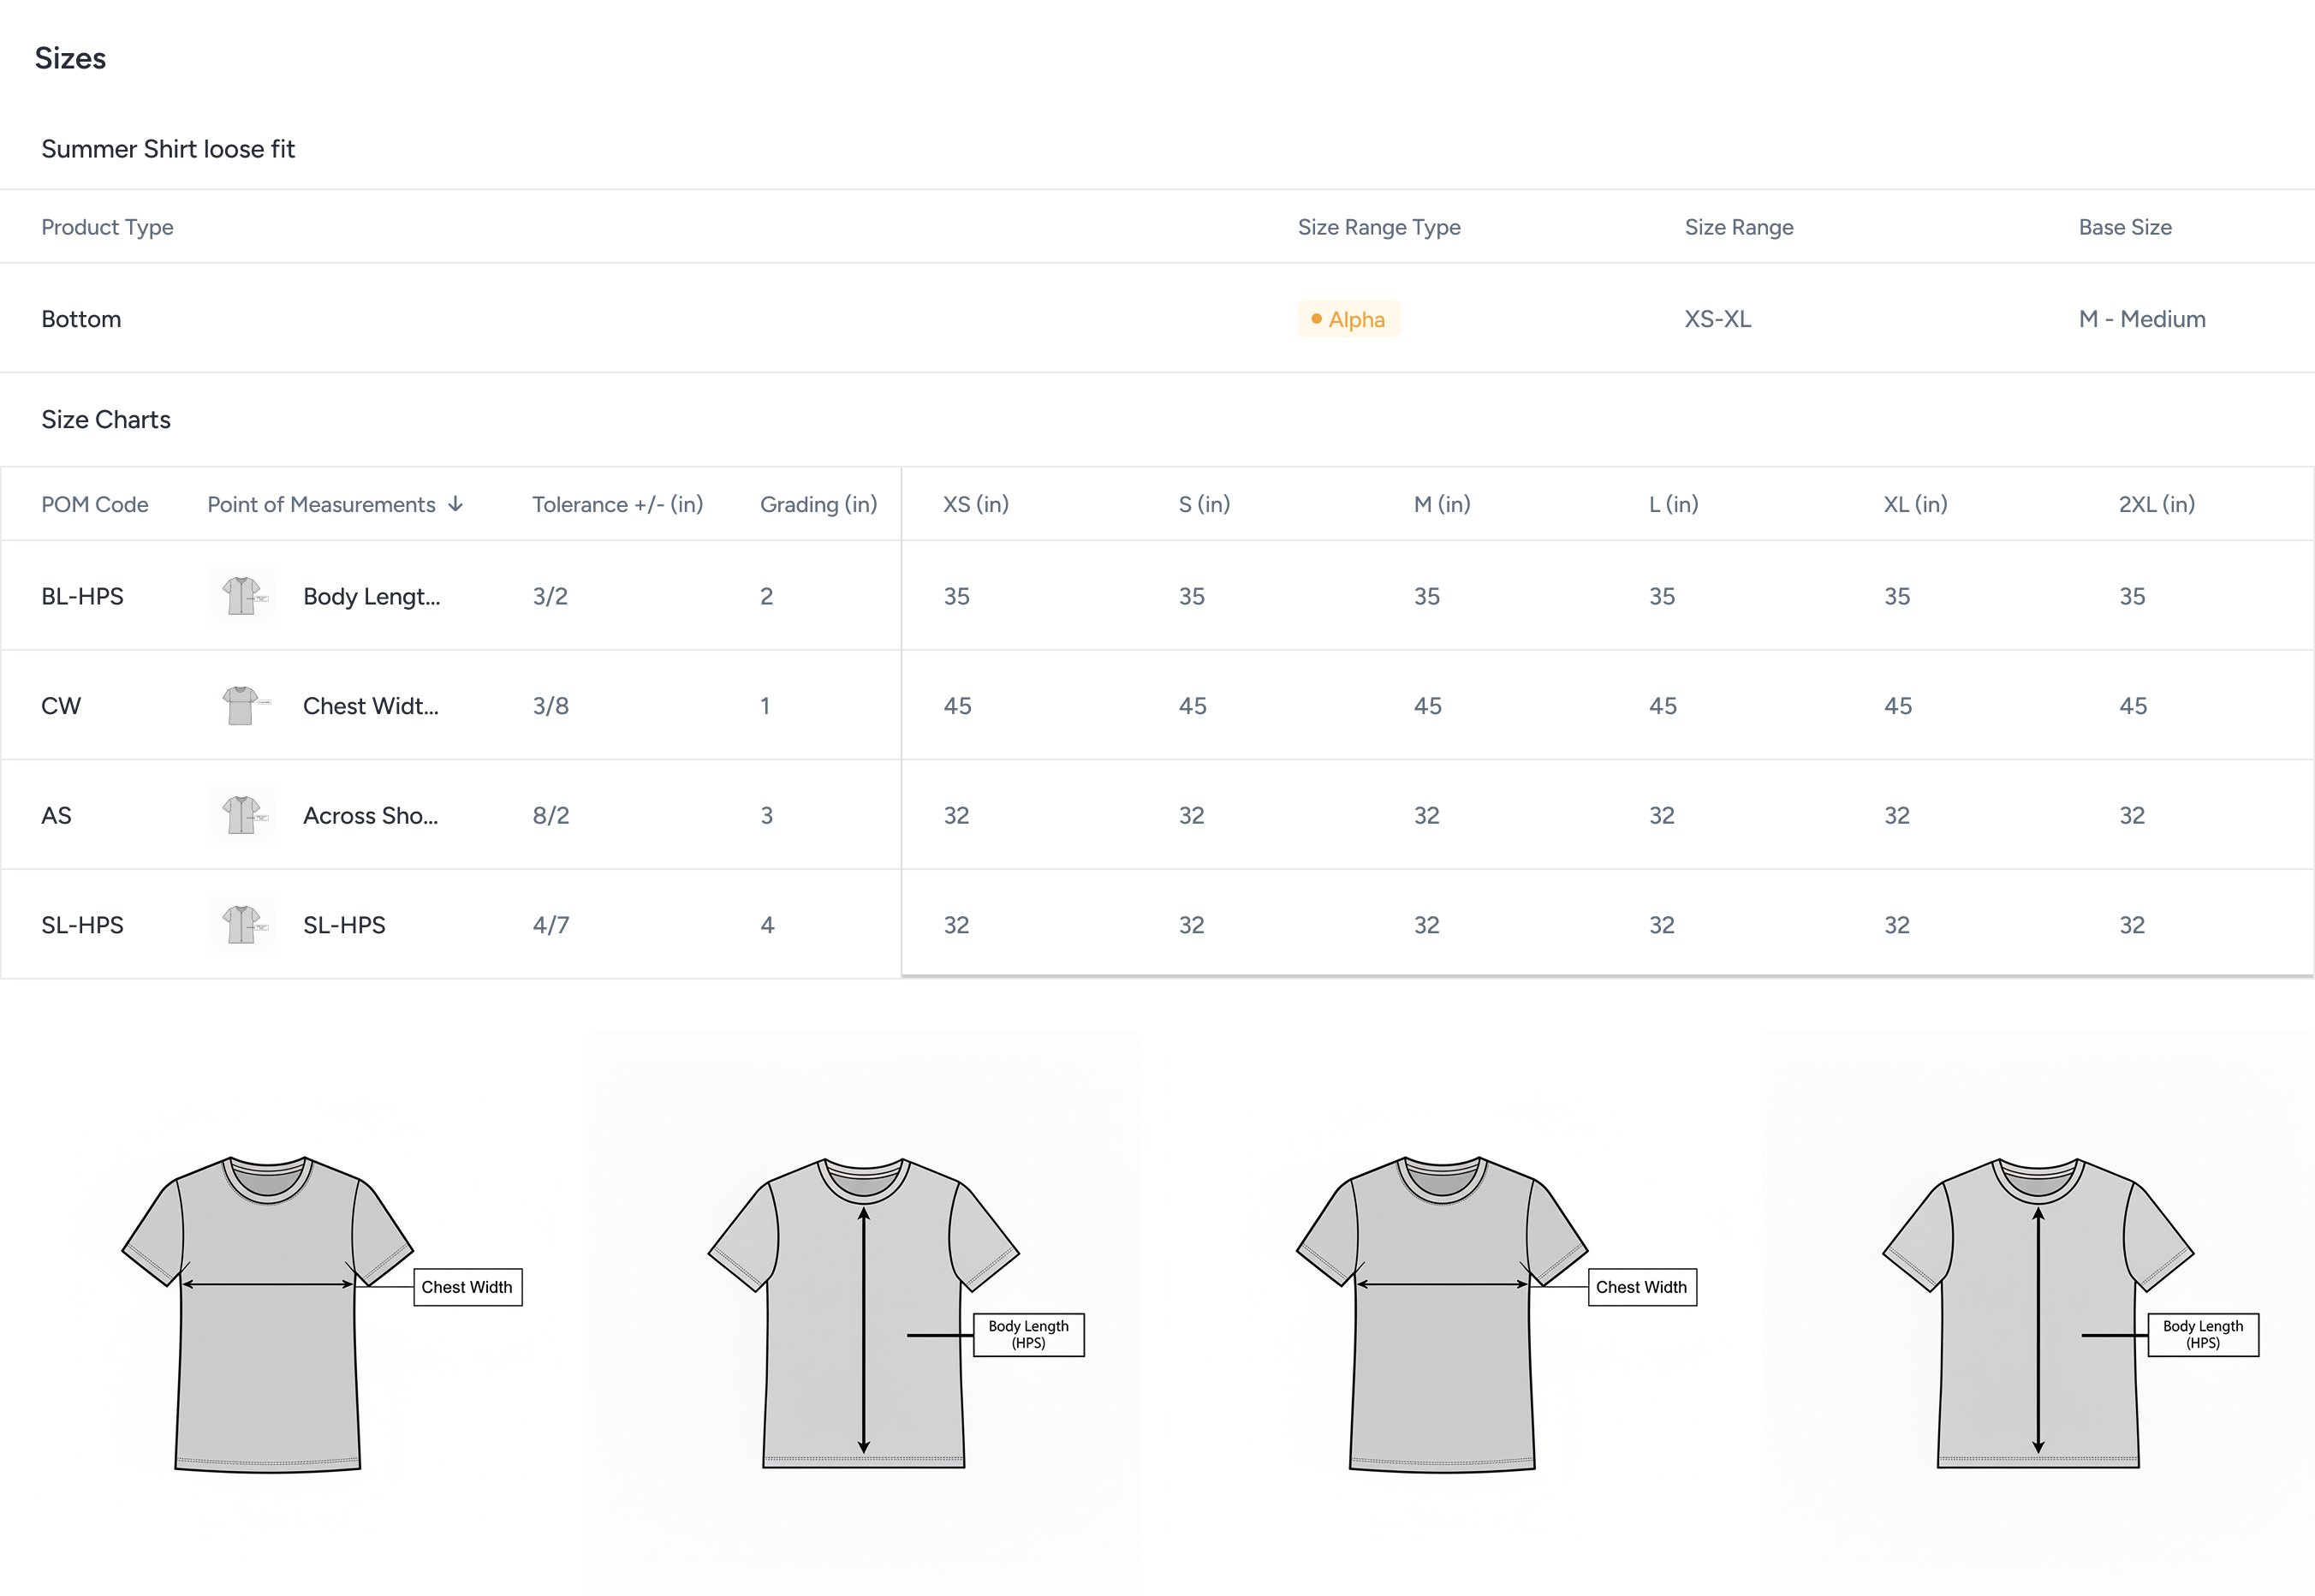
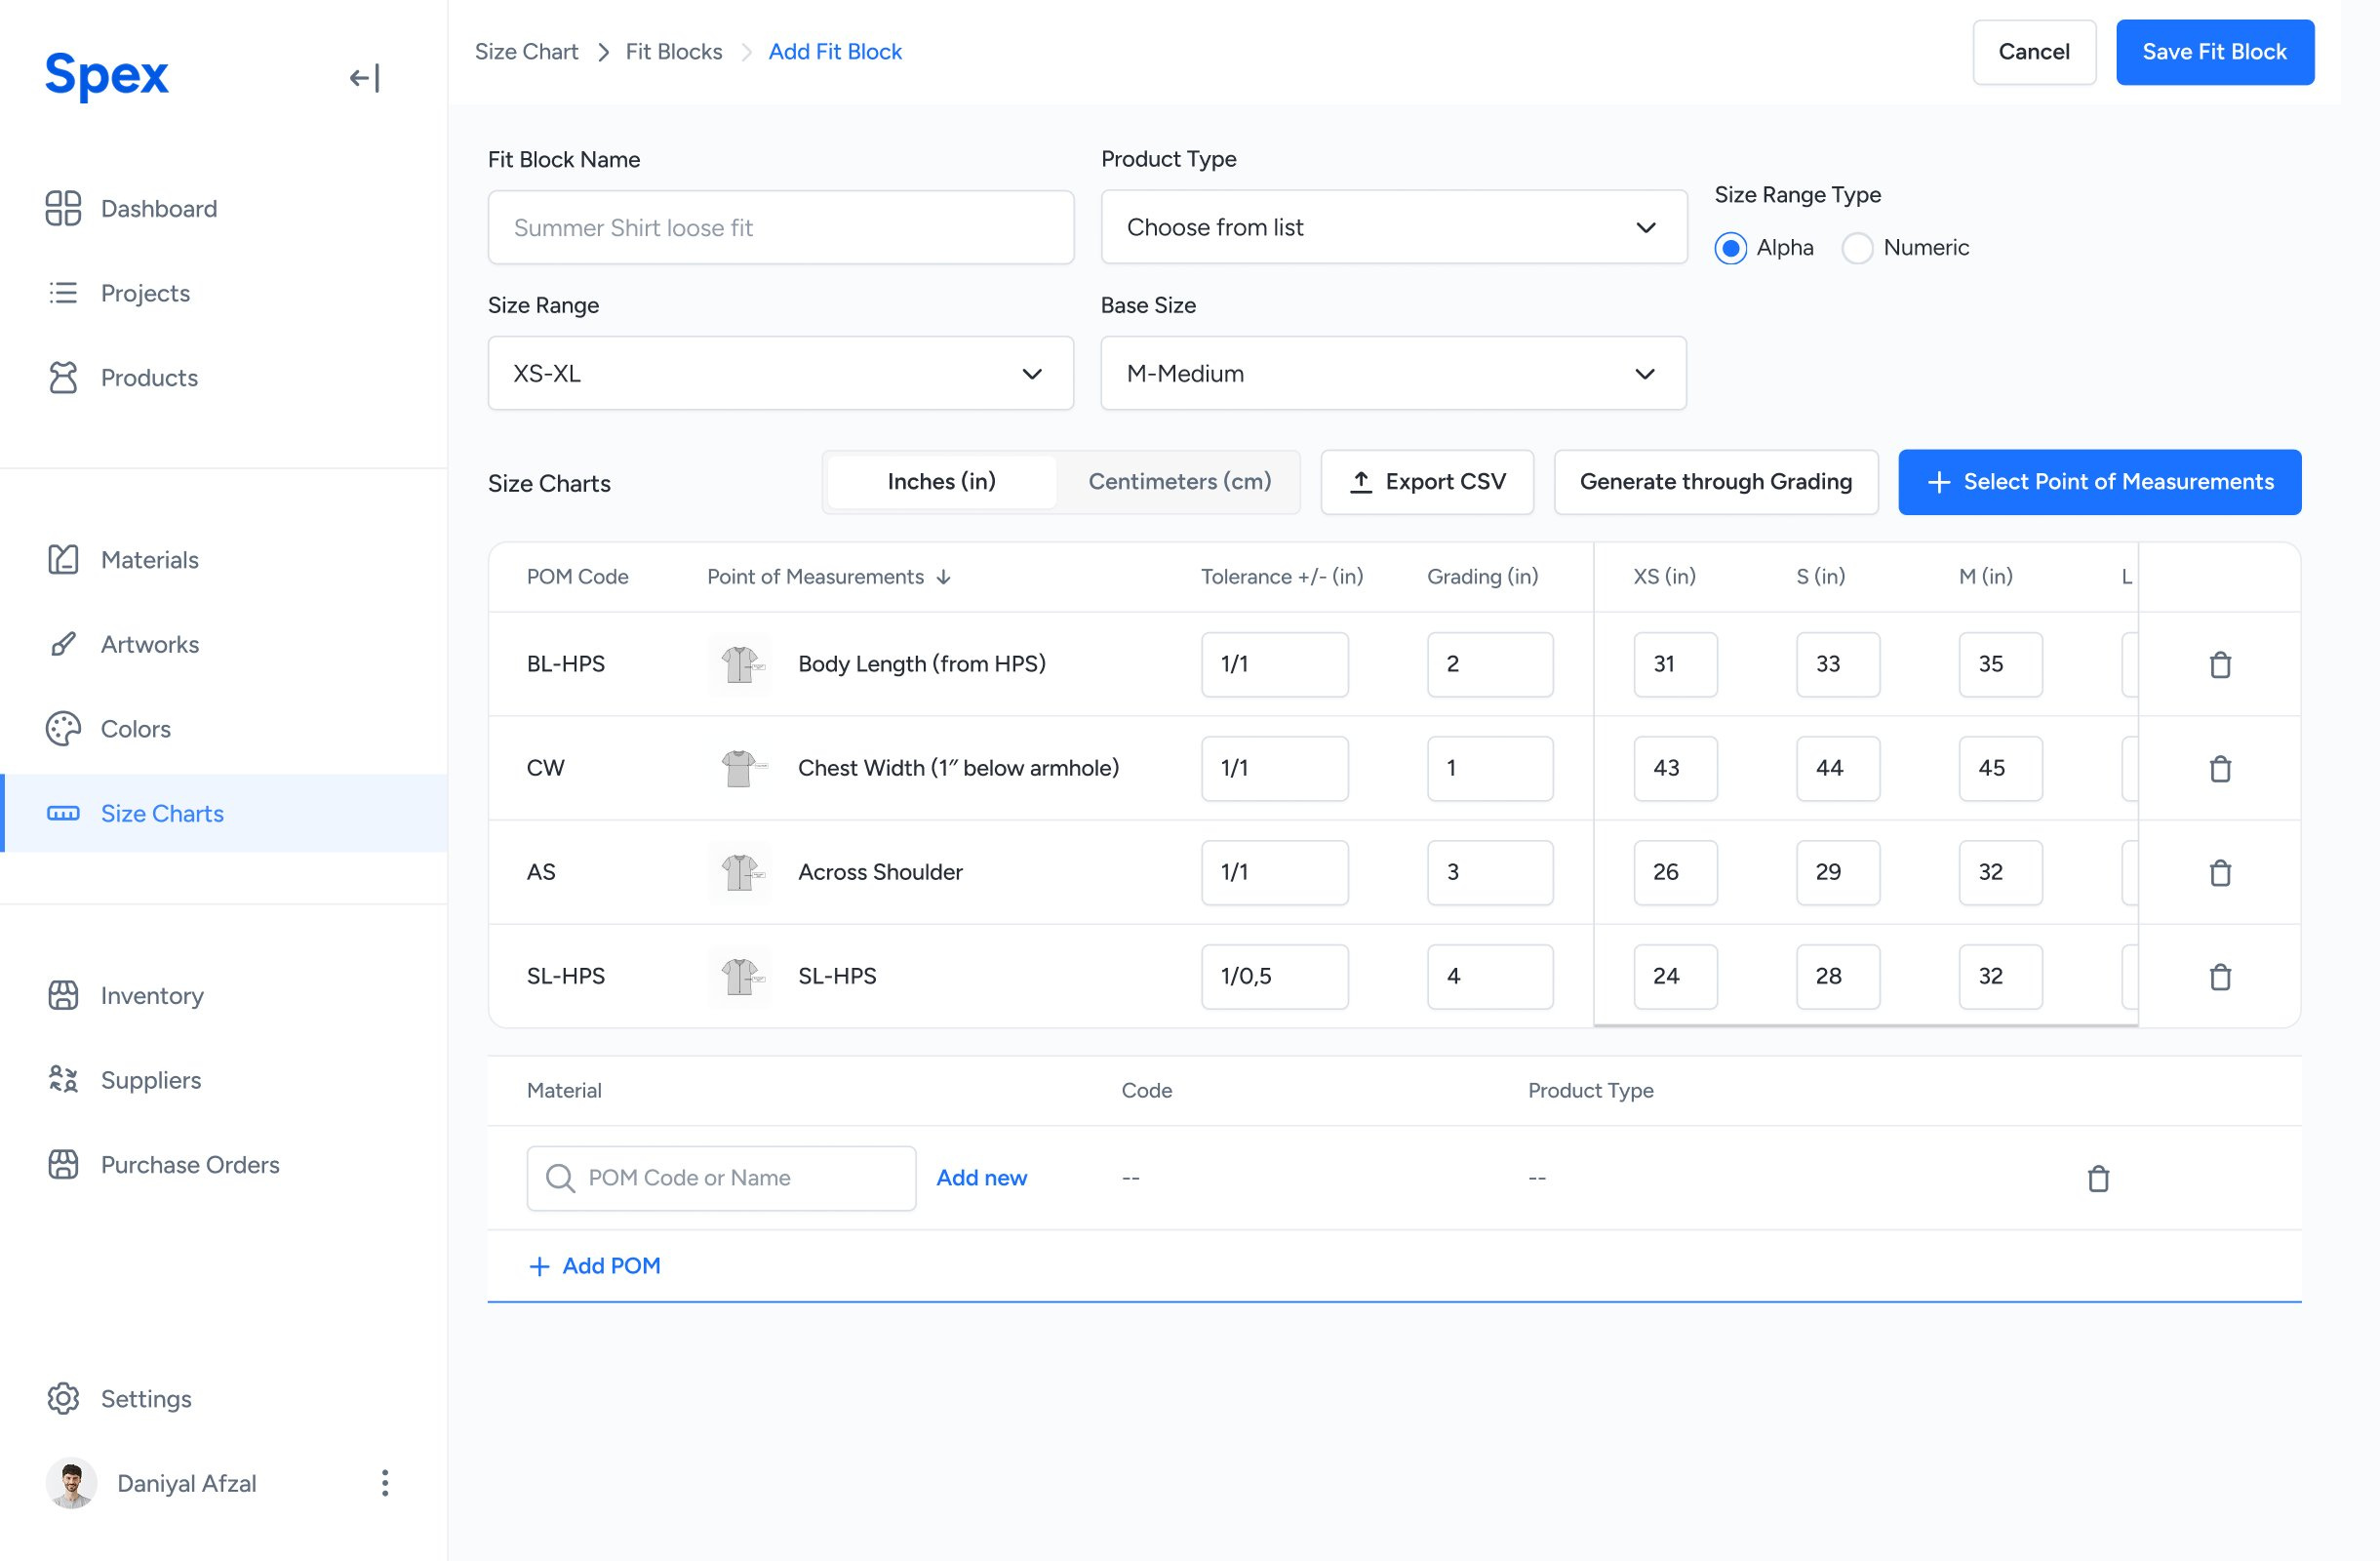
Original Design Work
Original Design Work
Story
As a Product or Technical Designer, I want to create and manage reusable fit blocks so that I can standardize measurements and quickly generate graded size charts for tech packs.
Acceptance Criteria
- Size Charts module is accessible from the left sidebar.
- Module includes a Fit Blocks tab.
- Users can create a fit block with the following fields:
- Fit Block Name
- Product Type (Top, Bottom, Outerwear, Footwear, Accessories)
- Size Type (Alpha: XS–XL / Numeric: 28–34 / Extended: XS–9XL)
- Base Size (grading reference)
- Measurement Unit (Inches or Centimeters)
- Users can add base measurements and define grading/tolerance rules.
- Generate Sizes auto-populates the full size range based on grading rules.
- Generated size charts are editable before saving.
Story
As a technical designer, I want to define standardized Points of Measurement for garments, so that measurement guidelines remain consistent across all product types and teams.
Acceptance Criteria
- The POM module is available under Size Charts.
- Users can create a POM entry with:
- POM Name
- Product Type (dropdown: Top, Bottom, Outerwear, Footwear, Accessories)
- Reference Image upload to visually indicate measurement location (e.g., shoulder width, sleeve length, waist point)
- Each POM entry is saved as a reusable measurement standard.
- Uploaded reference images are stored and displayed alongside the POM definition for clarity.
- Users can edit or update existing POM definitions.
Step #2 — Provide Manufacturing Context & PRD
I provided Claude Design with the PRD, user story, basic workflow explanations, and the necessary manufacturing context related to fit blocks and size-range management. I kept the information concise and structured so Claude could better understand the problem space and workflow logic without unnecessary complexity.
“Before generating outputs, Claude Design asked several clarification questions — and that for me was the real value. It made decision coordination effortless and the whole workflow significantly easier to manage.”
Size Charts module — questions & answers
What should this design deliver?
A single hi-fi prototype of the Fit Blocks + POM tabs (one polished direction)
How should the Fit Block form + size grid relate?
Form on top, full-width grading table below (vertical stack)
How should grading rules be defined?
Define tolerance per POM
Size grid shows which range by default?
Full XS–9XL grading range (15 cols, horizontal scroll)
What POM rows should appear in the Fit Block grading table?
Standard pre-loaded set + ability to add as many as you want
POM tab layout?
Card grid (each POM = card with reference image preview)
Should we show populated data or empty state?
Populated: existing fit blocks + POMs in a list view, plus the editor
Any tweakable controls to expose?
Switch between alpha/numeric size types
Source: Claude Design
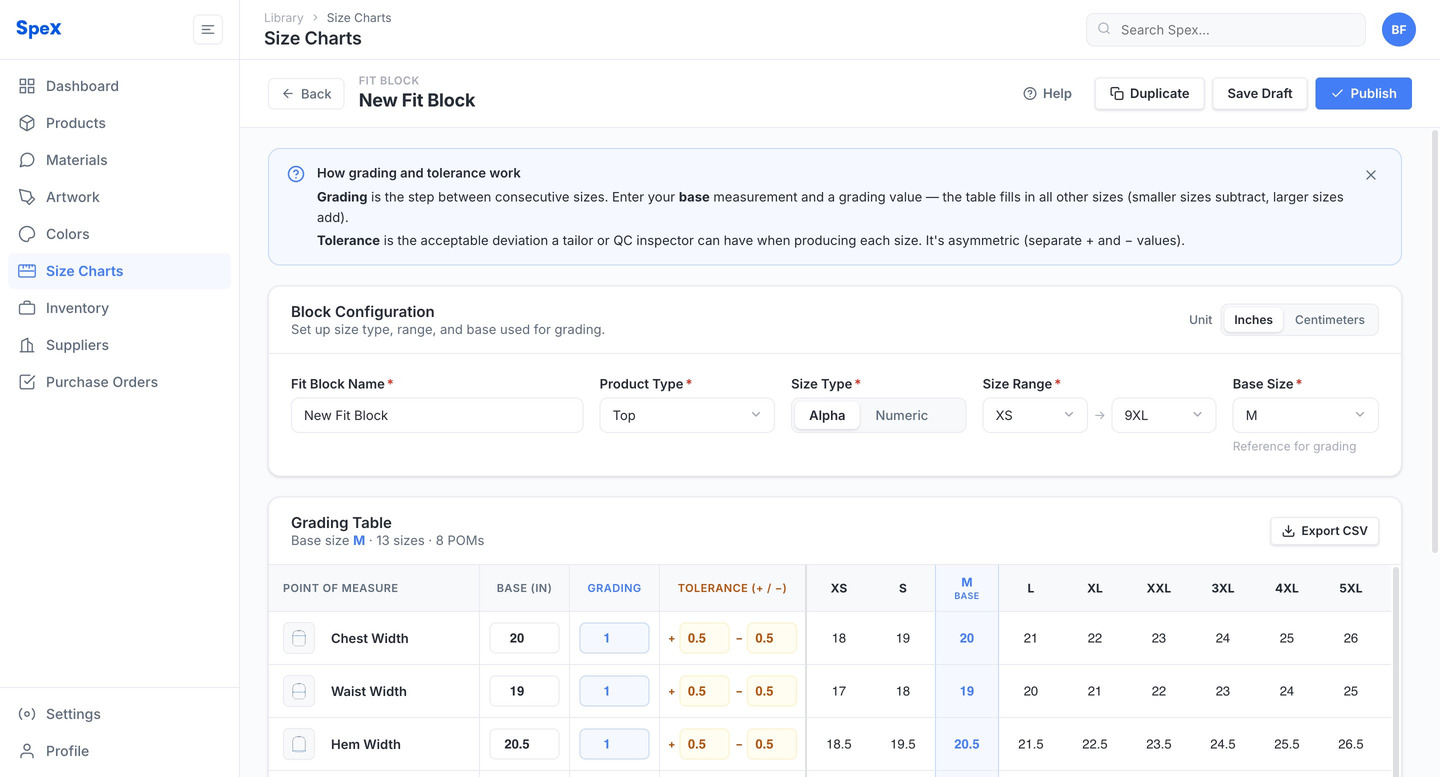
Quick Note
This is the final output after several corrections. Claude initially confused tolerance and grading, and misrendered the logo using a placeholder. After targeted prompts to correct both, it resolved them — replacing the logo with one it generated itself. Small mistakes — but each correction took a considerable amount of time.
My Reflection
Pros
- Handled the manufacturing workflow context surprisingly well, grasping the problem space quickly.
- The clarification process felt genuinely collaborative — Claude asked the right questions rather than waiting for purely prompt-based input.
- Provided structured options for decision-making, making the process smoother and easier to manage.
- Certain decisions could simply be delegated back via “let Claude decide,” making the interaction feel more intuitive and innovative.
Cons
- The overall process was slower than expected.
- Certain generations took up to 10 minutes to produce tangible outputs.
- Generation errors occurred at times, requiring retries and breaking the continuity.
- Speed and stability felt inconsistent during longer interactions.
- Manual input felt noticeably harder compared to Figma Make.
Step #3 — Handover to Claude Code
Probably the easiest step of the entire process. Once the design was finalized in Claude Design, all I needed to do was download the project as a package and upload it directly to Claude Code. All you need in Claude Code is preinstalled Git. That’s it. And if you want to make any changes, you can do that directly in Claude Code.
Conclusion
Evaluation Criteria
- How quickly Claude could understand complex manufacturing workflows and interaction logic?
- Its ability to adapt to and extend an existing design system.
- The speed and efficiency of moving from prompts and product requirements to tangible design outputs.
- The quality and usability of generated outputs compared to the original manually designed solution.
- How quickly designs could move from Claude Design to implementation using Claude Code?
- The overall cost-effectiveness of using Claude Design for day-to-day product design workflows.
- Overall, Claude Design and Claude Code are among the most powerful AI-assisted product design and implementation tools I have used so far. In particular, Claude Design stands out as one of the strongest agent experiences currently available for design-to-development workflows.
- One of the biggest strengths of Claude was its ability to quickly understand complex manufacturing and enterprise workflows. It only took a few prompts for the system to grasp the user stories, workflow logic, and expected outputs before generating relevant and structured solutions. In many cases, the generated results felt more accurate and context-aware than what I experienced with Figma Make.
- When it comes to adopting and extending an existing design system, Claude performs reasonably well, but there is still room for improvement. While it can follow established patterns, it occasionally introduces new visual treatments or stylistic decisions that break consistency with the original design language. Because of this, human-in-the-loop remains important, particularly when scaling or extending mature enterprise design systems.
- In terms of speed and efficiency, Claude Design was slightly better than Figma Make, especially for handling more complex flows and generating structured interfaces. However, performance could slow down significantly for larger prompts or more detailed design inputs, which sometimes interrupted workflow continuity.
- The overall quality and usability of the generated designs were strong, particularly after a few refinement prompts. However, Claude occasionally leaned too heavily into visual enhancement rather than functional clarity — overusing primary colors, decorative styling, or visually “fancy” elements not necessary for enterprise usability. In product design, especially within systems, usability, hierarchy, and functional clarity should take precedence over visual embellishment.
- One of the most impressive aspects of the workflow was the transition from Claude Design to Claude Code. The handoff felt extremely seamless and efficient, making the design-to-implementation process significantly faster compared to traditional workflows. This tight integration demonstrates the real potential of AI-augmented product development.
- From a cost perspective, both Claude Design and Claude Code can become expensive for day-to-day use. The standard subscription tier often feels limiting for larger-scale tasks, token usage scales quickly, and reaching usage limits can interrupt momentum during active design exploration. Cost efficiency remains an important consideration for long-term production workflows.
- Overall, Claude Design and Claude Code represent a major step forward in AI-augmented product design and implementation. Their ability to understand complex workflows, accelerate ideation, and bridge the gap between design and development is genuinely impressive. At the same time, they still require human direction — especially around design consistency, usability judgment, and system-level thinking. The tools are powerful accelerators, but not yet complete replacements for experienced product design decision-making.